> ## Documentation Index
> Fetch the complete documentation index at: https://doc-test-my.mintlify.site/llms.txt
> Use this file to discover all available pages before exploring further.
# FPX
> Steps to integrate S2S JSON API and accept payments using FPX.
Financial Process Exchange (FPX) is an online banking payment method that allows end users to pay money directly from their bank account for all online transactions.
## Integration Steps
Follow the steps below to Razorpay Curlec S2S JSON API and accept payments using FPX.
**1.1** [Generate List of Banks Supporting FPX](#1-1-generate-the-list-of-banks-supporting-fpx)
**1.2** [Create an Order](#1-2-create-an-order)
**1.3** [Create a Payment](#1-3-create-a-payment)
**1.4** [Handle Payment Success and Error Events](#1-4-handle-payment-success-and-error-events)
**1.5** [Integrate Payments Rainy Day Kit](#1-5-integrate-payments-rainy-day-kit)
**1.6** [Fetch Payment Details and Verify Payment Status](#1-6-fetch-payment-details-and-verify-payment-status)
### 1.1 Generate the List of Banks Supporting FPX
The first step is identifying and getting the list of banks with their respective codes to integrate correctly. Razorpay Curlec uses its bank codes to correctly identify a bank entity in the system.
**Handy Tips**
FPX transactions are of two categories: B2B and B2C. We follow a nomenclature of suffixing `_C` as a parameter if the transaction is of a corporate type.
Use this endpoint to get the list of Banks and their respective codes:
```bash Request theme={null}
curl --location --request GET 'https://api.razorpay.com/v1/methods?key_id={MERCHANT_API_KEY}'
```
```json Response theme={null}
{
"entity": "methods",
"fpx": {
"PHBM": "Affin Bank",
"PHBM_C": "AFFINMAX",
"MFBB_C": "Alliance Bank (Business)",
"MFBB": "Alliance Bank (Personal)",
"ARBK": "AmBank",
"ARBK_C": "AmBank",
"AGOB": "AGRONet",
"AGOB_C": "AGRONetBIZ",
"BNPA_C": "BNP Paribas",
"BIMB_C": "Bank Islam",
"BIMB": "Bank Islam",
"BKRM_C": "i-bizRakyat",
"BKRM": "Bank Rakyat",
"BMMB_C": "Bank Muamalat",
"BMMB": "Bank Muamalat",
"BKCH": "Bank Of China",
"BSNA": "BSN",
"CIBB_C": "CIMB Bank",
"CIBB": "CIMB Clicks",
"CITI_C": "Citibank Corporate Banking",
"DEUT_C": "Deutsche Bank",
"HSBC_C": "HSBC Bank",
"HSBC": "HSBC Bank",
"HLBB_C": "Hong Leong Bank",
"HLBB": "Hong Leong Bank",
"KFHO_C": "KFH",
"KFHO": "KFH",
"MBBE_C": "Maybank2E",
"MBBE": "Maybank2E",
"MB2U": "Maybank2U",
"OCBC_C": "OCBC Bank",
"OCBC": "OCBC Bank",
"PBBE_C": "Public Bank",
"PBBE": "Public Bank",
"PBBN_C": "PB Enterprise",
"RHBB_C": "RHB Bank",
"RHBB": "RHB Bank",
"SCBL_C": "Standard Chartered",
"SCBL": "Standard Chartered",
"UOVB": "UOB Bank",
"UOVB_C": "UOB Regional"
}
}
```
### 1.2 Create an Order
To process a payment, create a Razorpay Curlec Order to correspond with the order in your system. Send the order request parameters to the following endpoint:
**Order is an important step in the payment process.**
* An order should be created for every payment.
* You can create an order using the [Orders API](#api-sample-code). It is a server-side API call. Know how to [authenticate](/docs/payments/dashboard/account-settings/api-keys#generate-api-keys) Orders API.
* The `order_id` received in the response should be passed to the checkout. This ties the order with the payment and secures the request from being tampered.
**Watch Out!**
Payments made without an `order_id` cannot be captured and will be automatically refunded. You must create an order before initiating payments to ensure proper payment processing.
#### API Sample Code
Use this endpoint to create an order using the Orders API.
`POST /orders`
```bash Curl theme={null}
curl -X POST https://api.razorpay.com/v1/orders
-U [YOUR_KEY_ID]:[YOUR_KEY_SECRET]
-H 'content-type:application/json'
-d '{
"amount": 100,
"currency": "MYR",
"receipt": "qwsaq1",
"partial_payment": true,
"first_payment_min_amount": 230,
"notes": {
"key1": "value3",
"key2": "value2"
}
}'
```
```java Java theme={null}
RazorpayClient razorpay = new RazorpayClient("[YOUR_KEY_ID]", "[YOUR_KEY_SECRET]");
JSONObject orderRequest = new JSONObject();
orderRequest.put("amount", 100); // amount in the smallest currency unit
orderRequest.put("currency", "MYR");
orderRequest.put("receipt", "order_rcptid_11");
Order order = razorpay.Orders.create(orderRequest);
} catch (RazorpayException e) {
// Handle Exception
System.out.println(e.getMessage());
}
```
```python Python theme={null}
import razorpay
client = razorpay.Client(auth=("YOUR_ID", "YOUR_SECRET"))
DATA = {
"amount": 100,
"currency": "MYR",
"receipt": "receipt#1",
"notes": {
"key1": "value3",
"key2": "value2"
}
}
client.order.create(data=DATA)
```
```php PHP theme={null}
$api = new Api($key_id, $secret);
$api->order->create(array('receipt' => '123', 'amount' => 100, 'currency' => 'MYR', 'notes'=> array('key1'=> 'value3','key2'=> 'value2')));
```
```csharp .NET theme={null}
RazorpayClient client = new RazorpayClient("[YOUR_KEY_ID]", "[YOUR_KEY_SECRET]");
Dictionary options = new Dictionary();
options.Add("amount", 100); // amount in the smallest currency unit
options.add("receipt", "order_rcptid_11");
options.add("currency", "MYR");
Order order = client.Order.Create(options);
```
```ruby Ruby theme={null}
require "razorpay"
Razorpay.setup('YOUR_KEY_ID', 'YOUR_SECRET')
options = amount: 100, currency: 'MYR', receipt: ''
order = Razorpay::Order.create
```
```javascript Node.js theme={null}
var instance = new Razorpay({ key_id: 'YOUR_KEY_ID', key_secret: 'YOUR_SECRET' })
instance.orders.create({
amount: 100,
currency: "MYR",
receipt: "receipt#1",
notes: {
key1: "value3",
key2: "value2"
}
})
```
```go Go theme={null}
import ( razorpay "github.com/razorpay/razorpay-go" )
client := razorpay.NewClient("YOUR_KEY_ID", "YOUR_SECRET")
data := map[string]interface{}{
"amount": 100,
"currency": "MYR",
"receipt": "some_receipt_id"
}
body, err := client.Order.Create(data)
```
```json Success Response theme={null}
{
"id": "order_IluGWxBm9U8zJ8",
"entity": "order",
"amount": 100,
"amount_paid": 0,
"amount_due": 100,
"currency": "MYR",
"receipt": "rcptid_11",
"offer_id": null,
"status": "created",
"attempts": 0,
"notes": [],
"created_at": 1642662092
}
```
```json Failure Response theme={null}
{
"error": {
"code": "BAD_REQUEST_ERROR",
"description": "Order amount less than minimum amount allowed",
"source": "business",
"step": "payment_initiation",
"reason": "input_validation_failed",
"metadata": {},
"field": "amount"
}
}
```
`amount` *mandatory*
: `integer` Payment amount in the smallest currency subunit. For example, if the amount is ₹500, enter `50000`.
`currency` *mandatory*
: `string` The currency in which the payment should be made by the customer. Length must be of 3 characters.
`receipt` *optional*
: `string` Your receipt id for this order should be passed here. Maximum length is 40 characters.
`notes` *optional*
: `json object` Key-value pair that can be used to store additional information about the entity. Maximum 15 key-value pairs, 256 characters (maximum) each. For example, `"note_key": "Beam me up Scotty”`.
`partial_payment` *optional*
: `boolean` Indicates whether the customer can make a partial payment. Possible values:
* `true`: The customer can make partial payments.
* `false` (default): The customer cannot make partial payments.
`first_payment_min_amount` *optional*
: `integer` Minimum amount that must be paid by the customer as the first partial payment. For example, if an amount of ₹7000 is to be received from the customer in two installments of #1 - ₹5000, #2 - ₹2000 then you can set this value as `500000`. This parameter should be passed only if `partial_payment` is `true`.
Know more about [Orders API](/docs/api/orders).
Descriptions for the response parameters are present in the [Orders Entity](/docs/api/orders/entity) parameters table.
The error response parameters are available in the [API Reference Guide](/docs/api/orders/create).
### 1.3 Create a Payment
Once an order is created, your next step is to create a payment. The following API will create a payment with `fpx` as the payment method:
`POST /payments/create/json`
```bash Request theme={null}
curl -u [YOUR_KEY_ID]:[YOUR_KEY_SECRET] \
-X POST https://api.razorpay.com/v1/payments/create/json \
-H "content-type: application/json" \
-d '{
"amount": 200,
"currency": "MYR",
"order_id": "order_LSA6ny1sGKAp0C",
"email": "nur.aisyah@example.com",
"contact": "+60123456789",
"method": "fpx",
"bank": "MB2U",
"callback_url": "https://merchant_callback_url.."
}'
```
```json Response theme={null}
{
"razorpay_payment_id": "pay_LUtJxInEqa0oAA",
"next": [
{
"action": "redirect",
"url": "https://api.razorpay.com/v1/payments/LUtJxInEqa0oAA/authenticate"
}
]
}
```
### Request Parameters
The payment request for each of the supported payment methods will slightly vary. Know more about the [relevant payment request fields](/docs/payments/payment-gateway/s2s-integration/payment-methods).
### Response Parameters
If the payment request is valid, the response contains the following fields.
`razorpay_payment_id`
: `string` Unique identifier of the payment. Present for all responses.
`next`
: `array` A list of action objects available to you to continue the payment process. Present when the payment requires further processing.
`action`
: `string` An indication of the next step available to you to continue the payment process. Possible values:
* `redirect` : Use this URL to redirect customer to submit the OTP on the bank page.
`url`
: `string` URL to be used for the action indicated.
The Payment API will return the payment id along with the authentication URL to which the user has to be redirected. You may choose to store the Payment id on your server to help us enquire about the status and other accounting purposes if required.
You may now choose to redirect the user to the authentication URL that you have received in the response.
### 1.4 Handle Payment Success and Error Events
Once the payment is completed by the customer, a `POST` request is made to the `callback_url` provided in the payment request. The data contained in this request will depend on whether the payment was a **success** or a **failure**.
#### Success Callback
If the payment made by the customer is successful, the following fields are sent:
* `razorpay_payment_id`
* `razorpay_order_id`
* `razorpay_signature`
```json Callback Example theme={null}
{
"razorpay_payment_id": "pay_LUtJxInEqa0oAA&",
"razorpay_order_id": "order_LUtJ52zWwapfqs&",
"razorpay_signature": "e617a6c035cb39feb6cd16358d83a4e3d30b11d9e8e2181e6ef442da1d41df20"
}
```
#### Failure Callback
If the payment has failed, the callback will contain details of the error. Refer to [Errors](/docs/api#errors) for details.
### 1.5 Integrate Payments Rainy Day Kit
Use Payments Rainy Day kit to overcome payments exceptions such as:
* [Late Authorisation](/docs/payments/payments/late-authorisation)
* [Payment Errors](/docs/errors)
### 1.6 Fetch Payment Details and Verify Payment Status
After receiving the `razorpay_payment_id` through the `callback_url`, use this endpoint to fetch the payment details:
```bash Request theme={null}
curl -u [YOUR_KEY_ID]:[YOUR_KEY_SECRET] \
-X POST https://api.razorpay.com/v1/payments/pay_LUuOjDOkeb63gS \
```
```json Response theme={null}
{
"id": "pay_LUuOjDOkeb63gS",
"entity": "payment",
"amount": 100,
"currency": "MYR",
"base_amount": 100,
"status": "captured",
"order_id": "order_LUuObyEK6ix6TZ",
"invoice_id": null,
"international": false,
"method": "fpx",
"amount_refunded": 0,
"refund_status": null,
"captured": true,
"description": null,
"card_id": null,
"bank": "MB2U",
"wallet": null,
"vpa": null,
"email": "nur.aisyah@example.com",
"contact": "+6012345678",
"notes": {
"notes_key_1": "Nasi Lemak"
},
"fee": 0,
"tax": 0,
"error_code": null,
"error_description": null,
"error_source": null,
"error_step": null,
"error_reason": null,
"acquirer_data": {},
"created_at": 1679562035
}
```
**Handy Tips**
On the Razorpay Dashboard, ensure that the payment status is `captured`. Refer to the payment capture settings page to know how to [capture payments automatically](/docs/payments/payments/capture-settings).
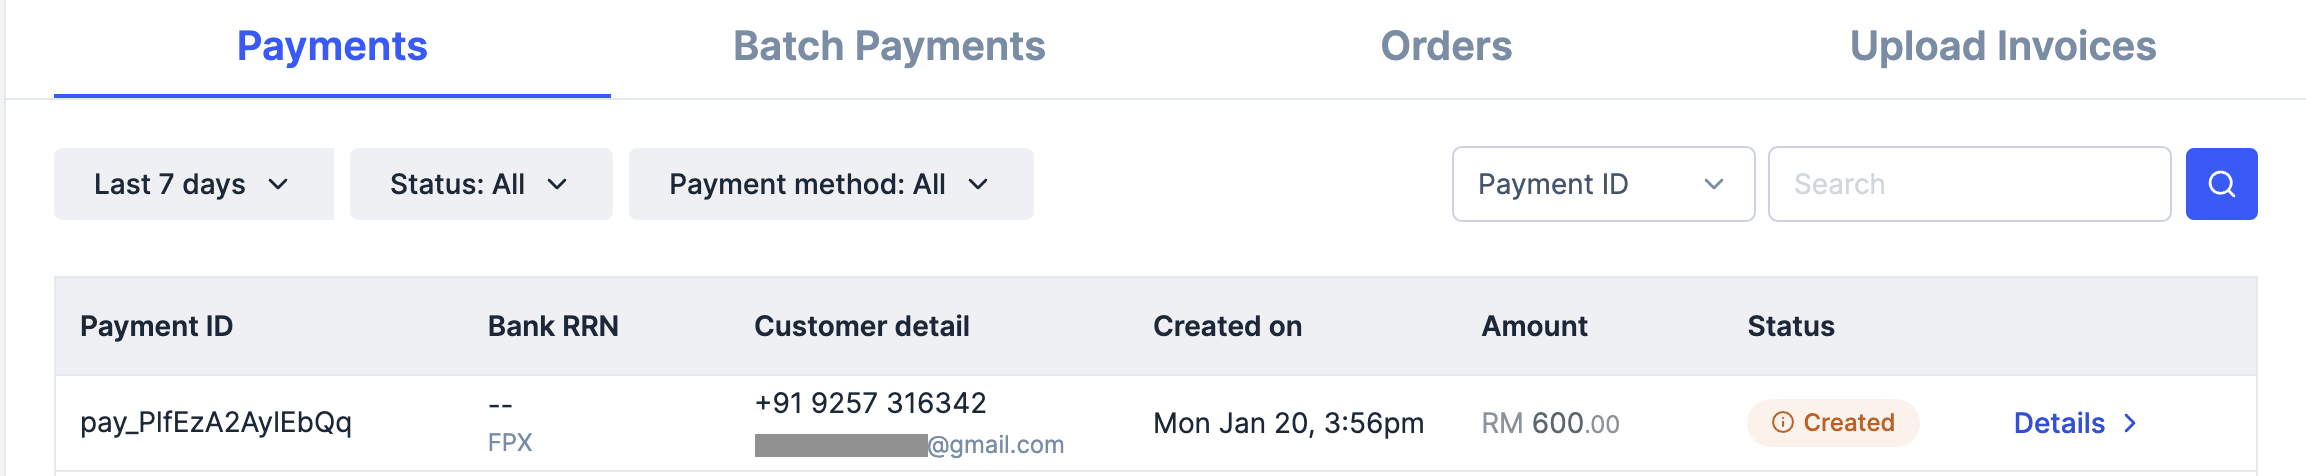
To verify the payment status from the Razorpay Dashboard:
1. Log in to the Razorpay Dashboard and navigate to **Transactions** → **Payments**.
2. Check if a **Payment Id** has been generated and note the status. In case of a successful payment, the status is marked as **Captured**.
 You can use Razorpay webhooks to configure and receive notifications when a specific event occurs. When one of these events is triggered, we send an HTTP POST payload in JSON to the webhook's configured URL. Know how to [set up webhooks.](/docs/webhooks/setup-edit-payments)
#### Example
If you have subscribed to the `order.paid` webhook event, you will receive a notification every time a customer pays you for an order.
[Poll Payment APIs](/docs/api/payments/fetch-all-payments) to check the payment status.
## Next Steps
[Step 2: Test Integration](/docs/payments/payment-gateway/s2s-integration/json/v2/test-integration)
You can use Razorpay webhooks to configure and receive notifications when a specific event occurs. When one of these events is triggered, we send an HTTP POST payload in JSON to the webhook's configured URL. Know how to [set up webhooks.](/docs/webhooks/setup-edit-payments)
#### Example
If you have subscribed to the `order.paid` webhook event, you will receive a notification every time a customer pays you for an order.
[Poll Payment APIs](/docs/api/payments/fetch-all-payments) to check the payment status.
## Next Steps
[Step 2: Test Integration](/docs/payments/payment-gateway/s2s-integration/json/v2/test-integration)