> ## Documentation Index
> Fetch the complete documentation index at: https://doc-test-my.mintlify.site/llms.txt
> Use this file to discover all available pages before exploring further.
# 1. Build Integration
> A step-by-step guide on how to integrate WooCommerce-enabled WordPress site with Razorpay.
Follow the steps given below to integrate Razorpay Payment Gateway to your WooCommerce-enabled WordPress site using the Razorpay Subscription for WooCommerce plugin.
## Integration Steps
Follow these steps to complete the integration:
### On Your WordPress Site
1. [Install the Razorpay Subscriptions for WooCommerce Plugin](/docs/payments/subscriptions/plugins/woocommerce/build-integration#step-1-install-razorpay-subscriptions-for-woocommerce-plugin).
2. [Configure WooCommerce Settings](/docs/payments/subscriptions/plugins/woocommerce/build-integration#step-2-configure-woocommerce-settings).
3. [Create a Subscriptions product using WooCommerce](/docs/payments/subscriptions/plugins/woocommerce/build-integration#step-3-create-a-subscriptions-products).
4. [Test integration](/docs/payments/subscriptions/plugins/woocommerce/test-integration).
### On Razorpay Dashboard
1. [Enable Webhooks](/docs/payments/subscriptions/plugins/woocommerce/build-integration#you-can-track-the-payment-status-in-three).
These 3 webhooks are auto configured for woocommerce subscription plugin:
* `subscription.cancelled`
* `subscription.paused`
* `subscription.resumed`
#### Step 1: Install Razorpay Subscriptions for WooCommerce Plugin
There are two methods to install the Razorpay Subscription for WooCommerce plugin:
* Install via WordPress Plugin Directory
* Manual Installation
#### Install via WordPress Plugin Directory
You can search for the plugin on the WordPress Admin Dashboard and add it.
1. In the **WordPress Admin Dashboard**, navigate to **Plugins** → **Add New**.
2. Search for **Razorpay Subscriptions for WooCommerce** and click **Install Now**.
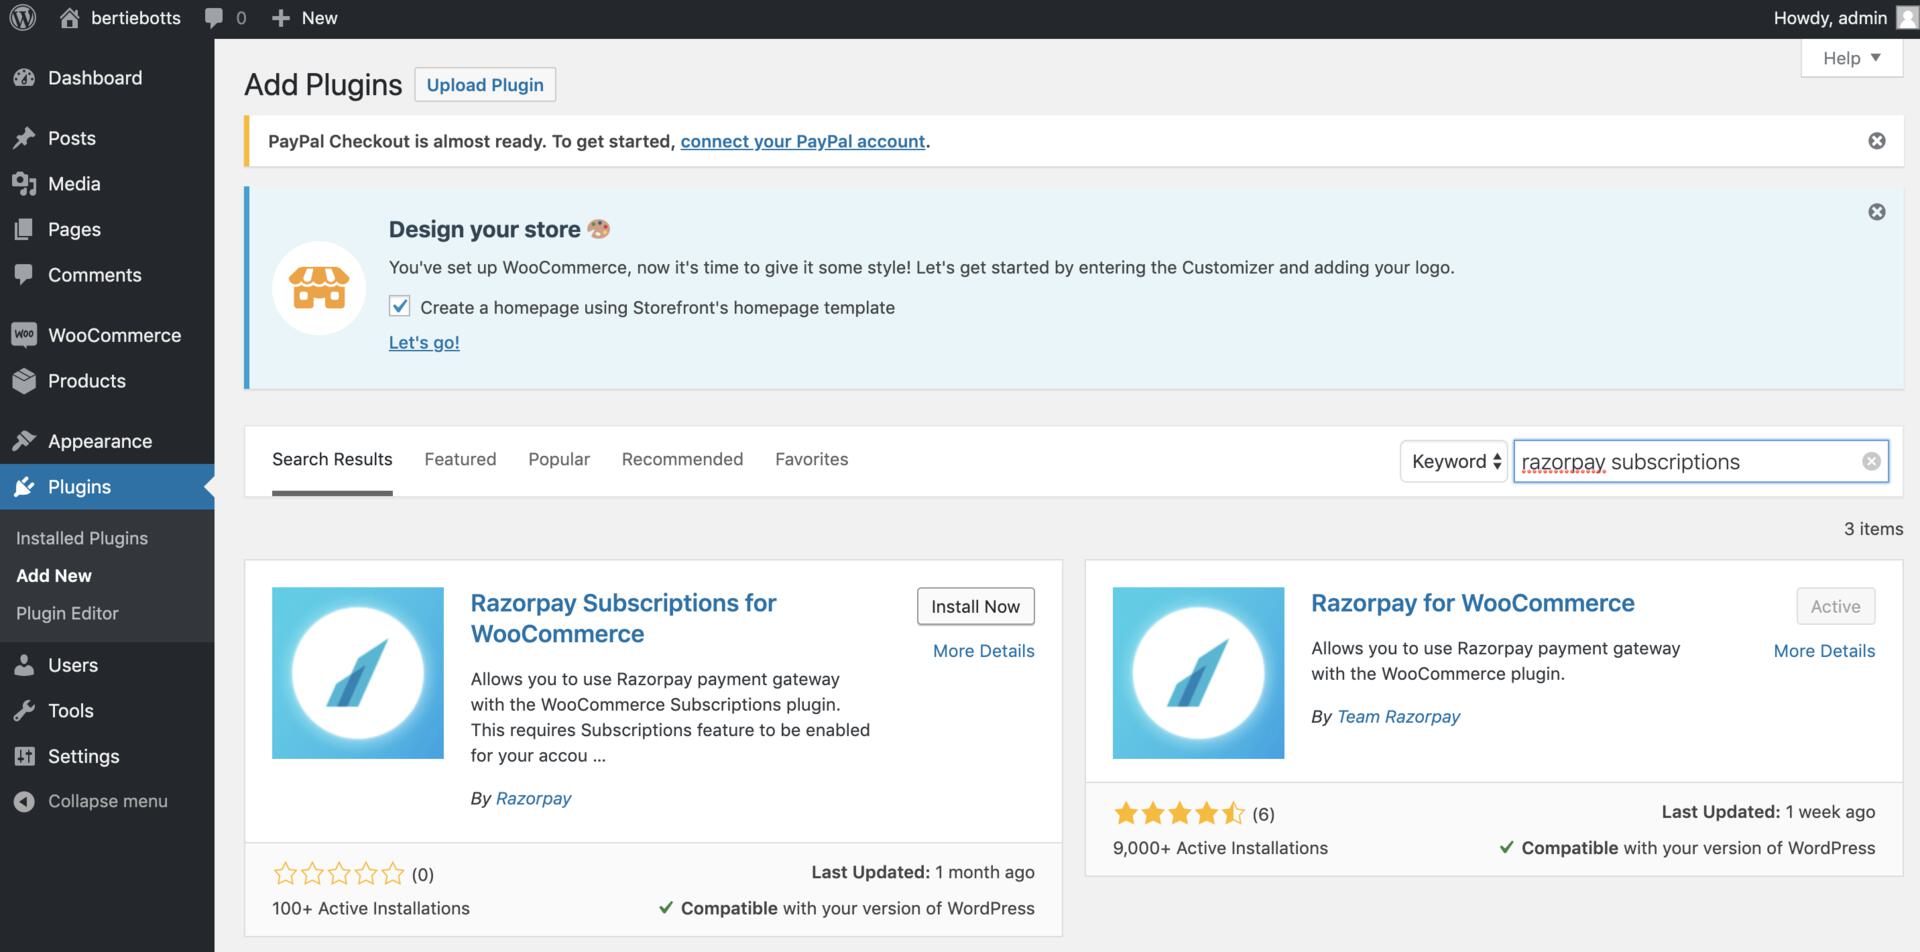 3. Click **Activate**.
#### Manual Installation
1. [Download a ZIP file](https://github.com/razorpay/razorpay-woocommerce-subscriptions/releases) of the Razorpay WooCommerce Subscriptions Plugin from the repository on Github.
2. Unzip this file and upload the contents in `wp-content` → Plugins.
3. Click **Activate**.
#### Manual Installation
1. [Download a ZIP file](https://github.com/razorpay/razorpay-woocommerce-subscriptions/releases) of the Razorpay WooCommerce Subscriptions Plugin from the repository on Github.
2. Unzip this file and upload the contents in `wp-content` → Plugins.
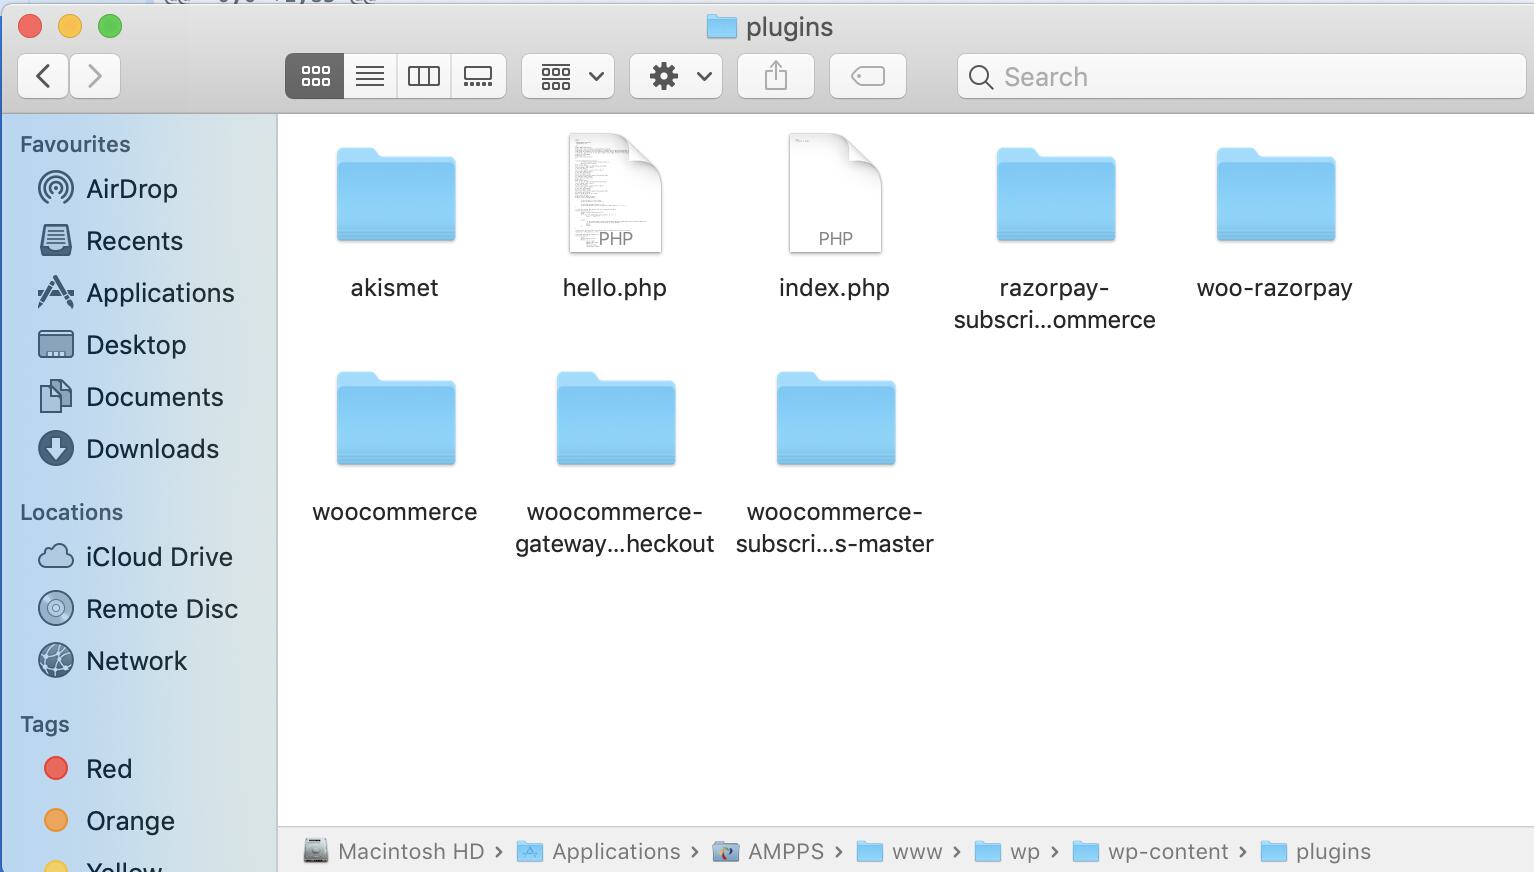 3. The plugin now appears in your **WordPress Dashboard** → **Plugins** folder.
4. Click **Activate**.
#### Step 2: Configure WooCommerce Settings
On your WordPress Dashboard, navigate to **WooCommerce** → **Settings** → **Payments** tab.
#### Settings for Razorpay Payment Gateway
1. Under the **Payments** tab, go to **Razorpay** → **Allow customers to securely pay via Razorpay** and click **Manage**.
3. The plugin now appears in your **WordPress Dashboard** → **Plugins** folder.
4. Click **Activate**.
#### Step 2: Configure WooCommerce Settings
On your WordPress Dashboard, navigate to **WooCommerce** → **Settings** → **Payments** tab.
#### Settings for Razorpay Payment Gateway
1. Under the **Payments** tab, go to **Razorpay** → **Allow customers to securely pay via Razorpay** and click **Manage**.
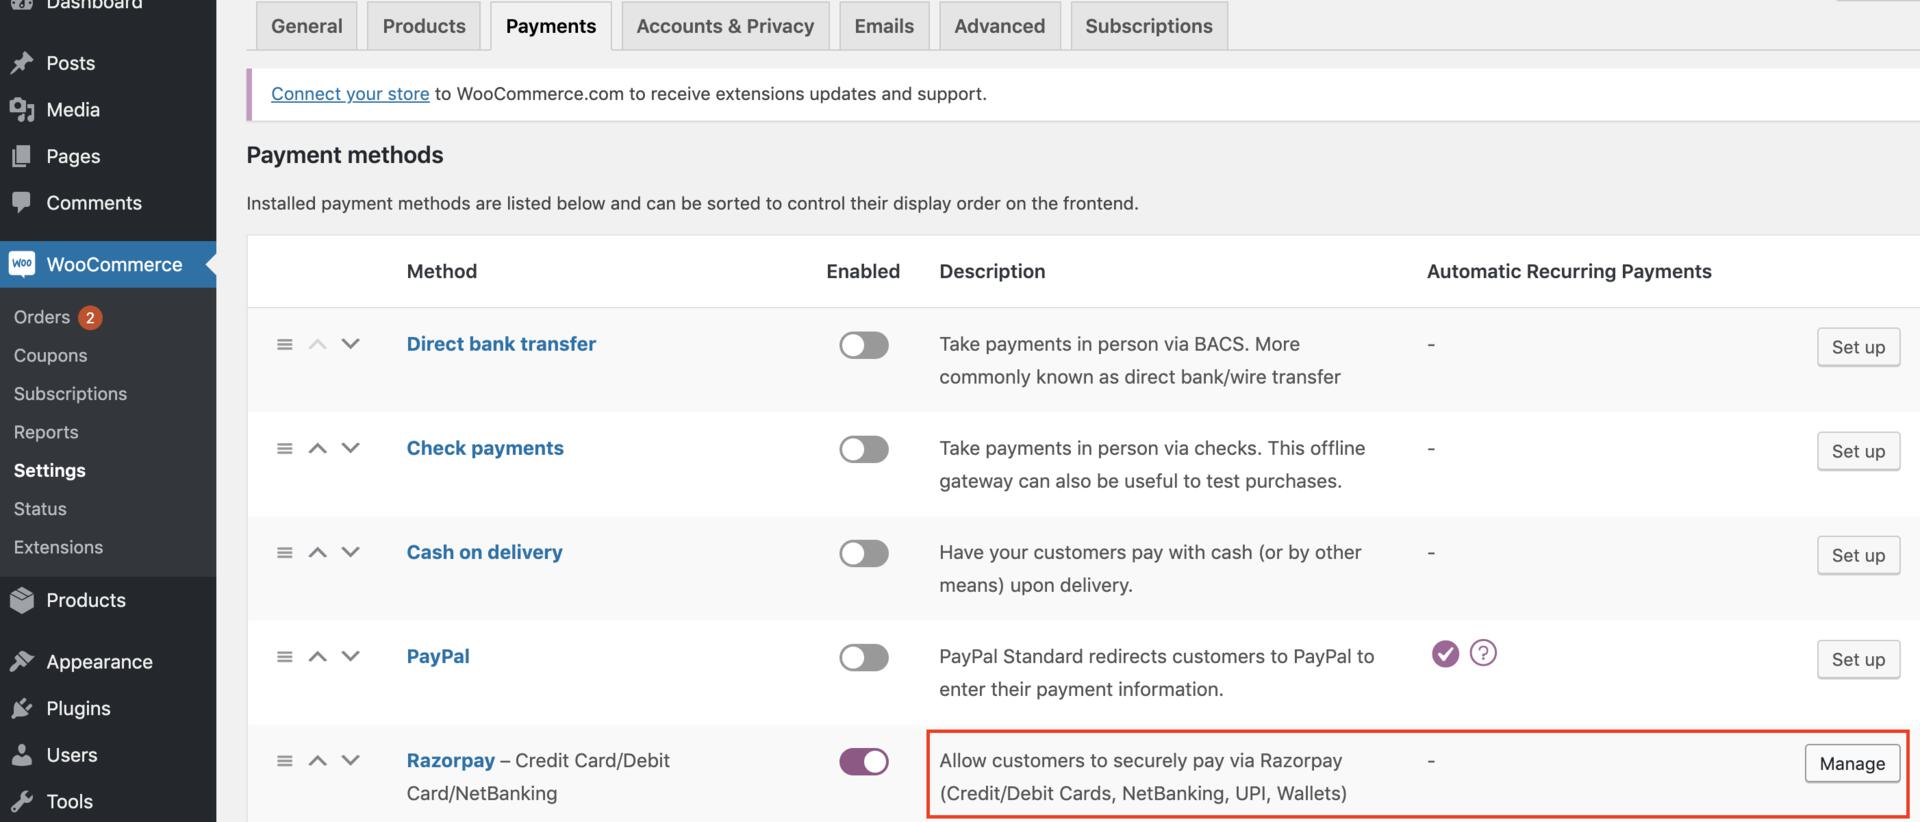 2. On the **Razorpay Payment Gateway** page, fill in the following field details and click **Save**:
| Field | Description |
| ------------------------ | --------------------------------------------------------------------------------------------------------------------------------------------------------------------------------------------------------------------------------------------------------------------------------------------------------- |
| Enable/Disable | Ensure that the **Enable this module?** option is selected. |
| Title | Add the title that is visible to the customer during checkout of a product with type - `Simple Product`. |
| Description | Enter a short description that is visible to the customer during checkout. |
| Key ID | Enter the Key ID generated from the Dashboard. |
| Key Secret | Enter the API Key Secret generated from the Dashboard. |
| Payment Action | To automatically capture successful payments, select `Authorize and Capture` option in the drop-down. Select `Authorize` if you want to capture payments manually from the [Razorpay Dashboard](/docs/payments/payments/dashboard#manual-capture-of-payments) or using [API](/docs/api/payments/capture). |
| Order Completion Message | Enter the message that must be displayed after an order is successfully placed. |
| Enable Webhook | Ensure that **Enable Razorpay Webhook** option is selected. [Set up webhooks](/docs/webhooks/setup-edit-payments) from the Dashboard. |
| Webhook Secret | Enter the webhook secret here. Webhook secret is used for webhook signature verification. This must match with the one added on the Razorpay Dashboard. |
#### Settings for Razorpay Subscriptions
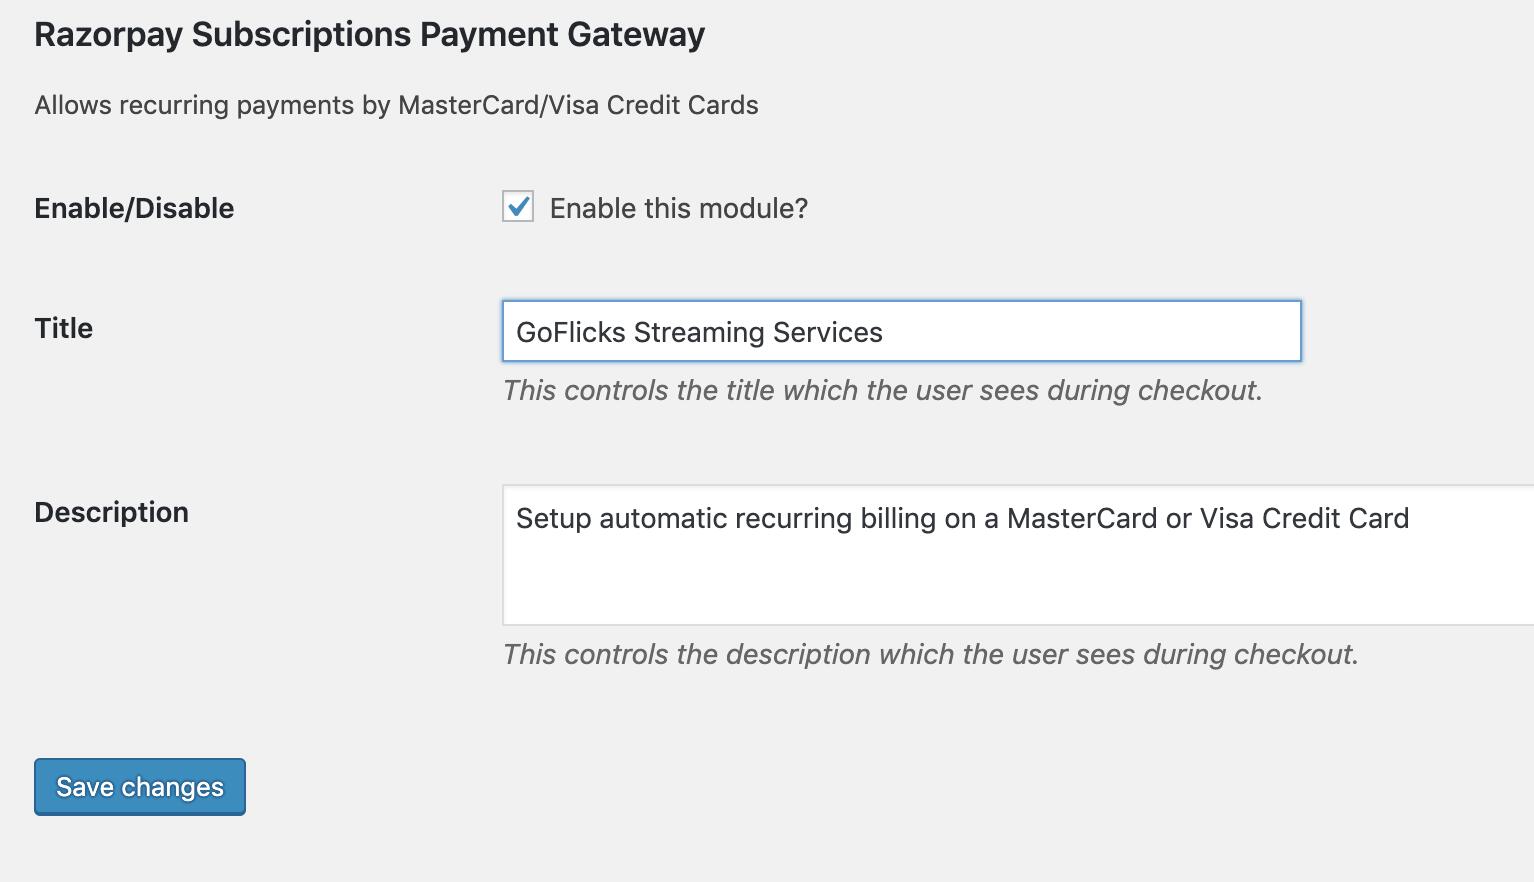
1. Under the **Payments** tab, go to **Razorpay Subscriptions** → **Allow customers to securely pay via Razorpay** and click **Manage**.
2. On the **Razorpay Subscriptions Payment Gateway** page, fill in the following field details and click **Save**:
| Field | Description |
| -------------- | -------------------------------------------------------------------------------------------------------------------------- |
| Enable/Disable | Ensure that the **Enable this module?** option is selected. |
| Title | Add the title that is visible to the customer during checkout of the subscription product with type `Simple Subscription`. |
| Description | Enter a short description that is visible to the customer during checkout. |
 #### Step 3: Create a Subscriptions Product
**Example:**
Let us assume Acme Corp. provides a streaming service called **GoFlicks**. There are two plans, **GoFlicks PremiumWatch** and **GoFlicks StandardWatch**. The details are mentioned below:
| Plan Name | Rate/Month (₹)(RM) | Free Trial (days) |
| ------------------------ | ------------------ | ----------------- |
| GoFlicks PremiumWatch HD | 999 | 15 |
| GoFlicks StandardWatch | 499 | N/A |
Let us create a Subscriptions product for **GoFlicks PremiumWatch HD**.
1. In the WordPress Dashboard, navigate to **Products** → **Add New**.
2. Enter the product name and add a brief description.
3. In the Product data section, enter the following details and click **Publish**:
1. Select **Simple Subscription** as the product type in the drop-down list.
2. Select **Virtual** check box as `GoFlicks` is a streaming service.
3. Under the **General** tab, enter the following details:
1. **Subscription Price:** Enter the price, select every as the **interval** and month as the **duration**.
2. **Expire after:** Select the period after which the subscription will expire. This period is in addition to any free trial or time provided before a synchronised first renewal date. Do not select **Never Expire** as it is not supported by Razorpay.
**Handy Tips**
WooCommerce supports Subscriptions for a maximum of 24 months.
3. **Sign-up fee:** Add an amount to be charged at the outset of the subscription. This fee will be charged immediately, even if the product has a free trial.
4. **Free trial:** Enter the period up to which the subscriber can use the product for free. The trial period cannot exceed 90 days, 52 weeks, 24 months or 5 years. A sign-up fee will still be charged from the outset of the subscription.
5. **Sale Price:** Enter the discounted price at which you want to offer the product. For example, you may offer **GoFlicks PremiumWatch HD** at MYR 899 per month for a limited period. You can schedule the special price by clicking **Schedule** and selecting the required dates on the calendar.
The product is created successfully. Similarly, create another Subscriptions product for **GoFlicks StandardWatch**.
* Check that the products are visible on the website to the users so that they can add it to their cart.
* [Make a test transaction](/docs/payments/subscriptions/plugins/woocommerce/test-integration) to ensure that the integration is working properly.
## Verify Payment Status
**Handy Tips**
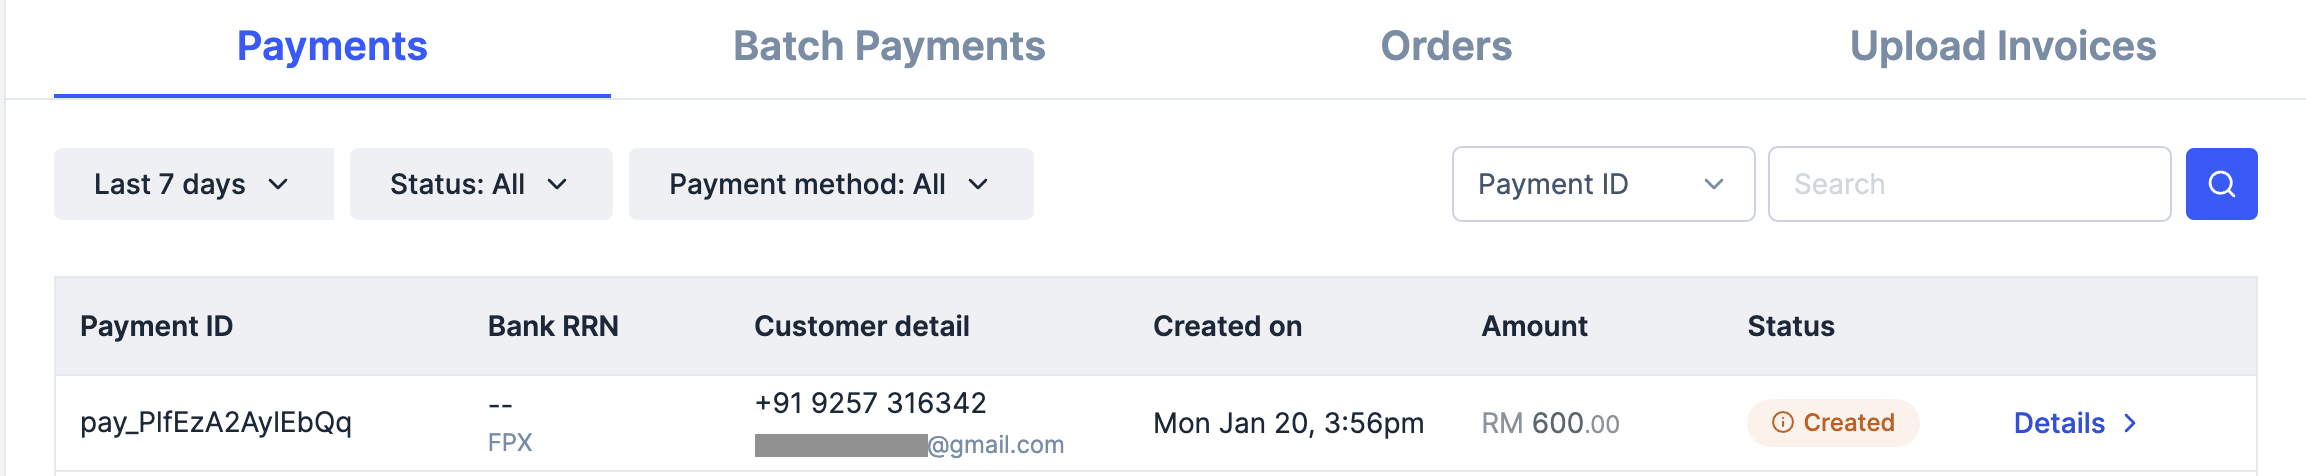
On the Razorpay Dashboard, ensure that the payment status is `captured`. Refer to the payment capture settings page to know how to [capture payments automatically](/docs/payments/payments/capture-settings).
To verify the payment status from the Razorpay Dashboard:
1. Log in to the Razorpay Dashboard and navigate to **Transactions** → **Payments**.
2. Check if a **Payment Id** has been generated and note the status. In case of a successful payment, the status is marked as **Captured**.
#### Step 3: Create a Subscriptions Product
**Example:**
Let us assume Acme Corp. provides a streaming service called **GoFlicks**. There are two plans, **GoFlicks PremiumWatch** and **GoFlicks StandardWatch**. The details are mentioned below:
| Plan Name | Rate/Month (₹)(RM) | Free Trial (days) |
| ------------------------ | ------------------ | ----------------- |
| GoFlicks PremiumWatch HD | 999 | 15 |
| GoFlicks StandardWatch | 499 | N/A |
Let us create a Subscriptions product for **GoFlicks PremiumWatch HD**.
1. In the WordPress Dashboard, navigate to **Products** → **Add New**.
2. Enter the product name and add a brief description.
3. In the Product data section, enter the following details and click **Publish**:
1. Select **Simple Subscription** as the product type in the drop-down list.
2. Select **Virtual** check box as `GoFlicks` is a streaming service.
3. Under the **General** tab, enter the following details:
1. **Subscription Price:** Enter the price, select every as the **interval** and month as the **duration**.
2. **Expire after:** Select the period after which the subscription will expire. This period is in addition to any free trial or time provided before a synchronised first renewal date. Do not select **Never Expire** as it is not supported by Razorpay.
**Handy Tips**
WooCommerce supports Subscriptions for a maximum of 24 months.
3. **Sign-up fee:** Add an amount to be charged at the outset of the subscription. This fee will be charged immediately, even if the product has a free trial.
4. **Free trial:** Enter the period up to which the subscriber can use the product for free. The trial period cannot exceed 90 days, 52 weeks, 24 months or 5 years. A sign-up fee will still be charged from the outset of the subscription.
5. **Sale Price:** Enter the discounted price at which you want to offer the product. For example, you may offer **GoFlicks PremiumWatch HD** at MYR 899 per month for a limited period. You can schedule the special price by clicking **Schedule** and selecting the required dates on the calendar.
The product is created successfully. Similarly, create another Subscriptions product for **GoFlicks StandardWatch**.
* Check that the products are visible on the website to the users so that they can add it to their cart.
* [Make a test transaction](/docs/payments/subscriptions/plugins/woocommerce/test-integration) to ensure that the integration is working properly.
## Verify Payment Status
**Handy Tips**
On the Razorpay Dashboard, ensure that the payment status is `captured`. Refer to the payment capture settings page to know how to [capture payments automatically](/docs/payments/payments/capture-settings).
To verify the payment status from the Razorpay Dashboard:
1. Log in to the Razorpay Dashboard and navigate to **Transactions** → **Payments**.
2. Check if a **Payment Id** has been generated and note the status. In case of a successful payment, the status is marked as **Captured**.
 You can use Razorpay webhooks to configure and receive notifications when a specific event occurs. When one of these events is triggered, we send an HTTP POST payload in JSON to the webhook's configured URL. Know how to [set up webhooks.](/docs/webhooks/setup-edit-payments)
#### Example
If you have subscribed to the `order.paid` webhook event, you will receive a notification every time a customer pays you for an order.
[Poll Payment APIs](/docs/api/payments/fetch-all-payments) to check the payment status.
### Next Steps
[Step 2: Test Integration](/docs/payments/subscriptions/plugins/woocommerce/test-integration)
You can use Razorpay webhooks to configure and receive notifications when a specific event occurs. When one of these events is triggered, we send an HTTP POST payload in JSON to the webhook's configured URL. Know how to [set up webhooks.](/docs/webhooks/setup-edit-payments)
#### Example
If you have subscribed to the `order.paid` webhook event, you will receive a notification every time a customer pays you for an order.
[Poll Payment APIs](/docs/api/payments/fetch-all-payments) to check the payment status.
### Next Steps
[Step 2: Test Integration](/docs/payments/subscriptions/plugins/woocommerce/test-integration)