

Prerequisites
Prerequisites
-
Contact our integrations team to get your mobile number, app, and GitHub account whitelisted to get access to the
https://github.com/upi-turbo/android-turbo-sample-app- sample app repository. You will find the AAR files (libraries for Turbo) in this repository. The AARs on the main branch are for the UAT environment, and the ones on the prod branch are for the production environment.
These are the important files in the sample app repo:android/app/libs: All libraries (Bank, SecureComponent and Turbo) common for headless SDK. Know more about Library Dependencies.android/app/uiLibrary: Library for Turbo UI SDK.android/app/build.gradle: All transitive dependencies needed to integrate the Turbo SDK.
- Integrate with Razorpay Flutter Standard Integration.
-
Import the following frameworks:
- Razorpay Android Standard SDK
- Razorpay Turbo Wrapper Plugin SDK (maven)
- Razorpay Turbo Core SDK
- Razorpay Turbo UI SDK
- Razorpay SecureComponent SDK
- Bank SDK
-
Add the following lines to your Android project’s
gradle.propertiesfile:android.enableJetifier=trueandroid.useAndroidX=true
Library Dependencies
Library Dependencies
Integrating library files is necessary to proceed with Turbo integration. Follow these steps to integrate library dependencies:
-
Navigate to your Flutter project’s directory and locate the
androidfolder. Find thesrcfolder insideandroidand create a newlibsfolder. -
Copy all your library files into the newly created
libsfolder. -
Open the
build.gradlefile in the app directory of your Flutter project. Add an implementation reference to the library files you added in thelibsfolder.
Java
- Update the dependencies section in your project’s
pubspec.yamlfile to include the libraries you added. Ensure the references point to the correct location, usuallymaster.
-
Run
flutter pub getin your terminal to ensure the dependencies are properly resolved and downloaded. -
Navigate to the
build.gradlefile in theandroiddirectory of therazorpay-flutterplugin module. Add acompile onlystatement to include the necessary libraries for compilation.
1. Integration Steps
Given below are the steps:Step 1: Whitelist Customer Bank Accounts *(Optional)*
Step 1: Whitelist Customer Bank Accounts *(Optional)*
You can whitelist (also known as allowlist) your customer’s bank accounts to ensure that only those accounts are considered during customer onboarding. By whitelisting the accounts at the start, you can avoid the bank account linking during payment. Use the Customer APIs to create customers and add their bank account details.For example, if a customer, Gaurav, has two bank accounts ABC and XYZ, you can use the APIs to create a customer id and link the bank accounts to that id. You can then pass this customer id at the time of payment.Follow these steps.
Step 1.1: Create a Customer
Step 1.1: Create a Customer
Use this endpoint to create or add a customer with basic details such as name and contact details.
Request Parameters
Request Parameters
name optional
: string Customer’s name. Alphanumeric value with period (.), apostrophe (’), forward slash (/), at (@) and parentheses are allowed. The name must be between 3-50 characters in length. For example, Nur Aisyah.contact optional
: string The customer’s phone number. A maximum length of 15 characters including country code. For example, +60748901142.email optional
: string The customer’s email address. A maximum length of 64 characters. For example, nur.aisyah@example.com.fail_existing optional
: string Possible values:1(default): If a customer with the same details already exists, throws an error.0: If a customer with the same details already exists, fetches details of the existing customer.
notes optional
: object This is a key-value pair that can be used to store additional information about the entity. It can hold a maximum of 15 key-value pairs, 256 characters (maximum) each. For example, "note_key": "Beam me up Scotty”.Response Parameters
Response Parameters
id
: string Unique identifier of the customer. For example, cust_1Aa00000000004.name
: string Customer’s name. Alphanumeric, with period (.), apostrophe (’), forward slash (/), at (@) and parentheses allowed. The name must be between 3-50 characters in length. For example, Nur Aisyah.contact
: string The customer’s phone number. A maximum length of 15 characters including country code. For example, +60748901142.email
: string The customer’s email address. A maximum length of 64 characters. For example, nur.aisyah@example.com.notes
: json object This is a key-value pair that can be used to store additional information about the entity. It can hold a maximum of 15 key-value pairs, 256 characters (maximum) each. For example, "note_key": "Beam me up Scotty”.created_at
: integer UNIX timestamp, when the customer was created. For example, 1234567890.Step 1.2: Add Customer's Bank Account
Step 1.2: Add Customer's Bank Account
The following endpoint adds the customer’s bank accounts.
Path Parameter
Path Parameter
customer_id mandatory
: string Customer id of the customer whose bank account is to be added.Request Parameters
Request Parameters
account_number mandatory
: string Customer’s bank account number. For example, 11214311215411.beneficiary_name mandatory
: string The name of the beneficiary associated with the bank account.beneficiary_address1 optional
: string The virtual payment address.beneficiary_email optional
: string Email address of the beneficiary. For example, gaurav.kumar@example.com.beneficiary_mobile optional
: string Mobile number of the beneficiary.beneficiary_city optional
: string The city of the beneficiary.beneficiary_state optional
: string The state of the beneficiary.beneficiary_country optional
: string The country of the beneficiary.beneficiary_pin optional
: integer The pin code of the beneficiary’s address.ifsc_code mandatory
: string The IFSC of the bank branch associated with the account.Response Parameters
Response Parameters
bank_accounts
: array An array containing bank account details.id
: string Unique identifier of the bank account.entity
: string The type of entity, which in this case is bank_account.ifsc
: string The IFSC of the bank branch associated with the account.bank_name
: string The name of the bank.name
: string The name associated with the bank account.notes
: object Set of key-value pairs that can be used to store additional information about the payment.account_number
: integer Customer’s bank account number. For example, 11214311215411.Step 2: Create an Order *(Mandatory)*
Step 2: Create an Order *(Mandatory)*
Pass the investor bank account details to the
bank_account array of the Orders API. Given below is the sample code when the method is upi.Request Parameters
Request Parameters
amount mandatory
: integer The transaction amount expressed in paise (currency supported is INR). For example, for an actual amount of ₹1, the value of this field should be 100.currency mandatory
: string The currency in which the transaction should be made. You can create orders in INR only.receipt optional
: string Receipt number that corresponds to this order, set for your internal reference. Maximum length is 40 characters.notes optional
: json object Key-value pair that can be used to store additional information about the entity. Maximum 15 key-value pairs, 256 characters (maximum) each. For example, "note_key": "Beam me up Scotty”.method mandatory
: string The payment method used to make the payment. If this parameter is not passed, investors will be able to make payments using both netbanking and UPI payment methods. Possible values:netbanking: Investors can make payments only using netbanking.card: Investors can make payments using debit card.upi: Investors can make payments only using UPI.
bank_account mandatory
: object Details of the bank account that the investor has provided at the time of registration.account_number mandatory
: string The bank account number from which the investor should make the payment. For example, 765432123456789 Payments will not be processed for an incorrect account number.name mandatory
: string The name linked to the bank account. For example, Gaurav Kumar.ifsc mandatory
: string The bank IFSC. For example, HDFC0000053.Response Parameters
Response Parameters
id
: string Unique identifier of the order.entity
: string Indicates the type of entity. Here, it is order.amount
: integer The order amount represented in the smallest unit of the currency passed. For example, amount = 100 translates to 100 paise, that is ₹1 (default currency is INR).amount_paid
: integer The amount that has been paid.amount_due
: integer The amount that is yet to be paid.currency
: string The 3-letter ISO currency code for the payment. Currently, we support INR only.receipt
: string A unique identifier of the order entered by the user. For example, BILL13375649.status
: string The status of the order.notes
: object Key-value pair you can use to store additional information about the entity. Maximum of 15 key-value pairs, 256 characters each. For example, “note_key”: “Beam me up Scotty”.created_at
: integer The Unix timestamp at which the order was created.offer_id
: string Unique identifier of the offer.attempts
: integer The number of payment attempts, successful and failed, that have been made against this order.Step 3: Turbo UPI SDK Action
Step 3: Turbo UPI SDK Action
You need to link the customer’s UPI account with your app. Use the code samples given below to fetch the UPI account.
1 Initialise the SDK
1 Initialise the SDK
Use the code given below to initialise the SDK.
Import Package
2 Link New UPI Account
2 Link New UPI Account
Use the following code to link the newly created UPI account with your app. This function can be called from anywhere in the application, providing multiple entry points for customers to link their UPI account with your app.
Link New UPI Account
Request Parameters
Request Parameters
mobileNumber mandatory
: string Mobile number of the customer.color optional
: string Colour in hex format- Initialise the instance to handle the event using the code given below:
Instantiate
- Handle payment failure responses, displaying important details such as error codes, error descriptions, and metadata. This function is responsible for handling and logging information in the event of a payment error.
Payment Failure Response Handling
- Handle successful payment responses, displaying key information like order ID, payment ID, and signature. This code manages and logs details when a payment transaction is successful.
Payment Success Response Handling
3 Submit Method
3 Submit Method
To accept payments, call Custom Checkout’s
submit method with the following payload:Submit Payment Details
Request Parameter
Request Parameter
payload mandatory
: Map<String, dynamic> Payload for initiating the transaction.Response Parameters
Response Parameters
Step 4: Handle Payment Success and Failure
Step 4: Handle Payment Success and Failure
The way you handle payment success and failure scenarios depends on the Checkout sample code you opted for in the previous step. Know how to handle payment success and failure.
Steps 5: Store Fields in Your Server
Steps 5: Store Fields in Your Server
A successful payment returns the following fields to the Checkout form.
- You need to store these fields in your server.
- You can confirm the authenticity of these details by verifying the signature in the next step.
Success Callback
Parameters
Parameters
razorpay_payment_id
: string Unique identifier for the payment returned by the Checkout only for successful payments.razorpay_order_id
: string Unique identifier for the order returned by the Checkout.razorpay_signature
: string Signature returned by the Checkout. This is used to verify the payment.Step 6: Verify Signature
Step 6: Verify Signature
This is a mandatory step to confirm the authenticity of the details returned to the Checkout form for successful payments.To verify the
razorpay_signature returned to you by the Checkout form:-
Create a signature in your server using the following attributes:
order_id: Retrieve theorder_idfrom your server. Do not use therazorpay_order_idreturned by Checkout.razorpay_payment_id: Returned by Checkout.key_secret: Available in your server. Thekey_secretthat was generated from the Dashboard.
-
Use the SHA256 algorithm, the
razorpay_payment_idand theorder_idto construct a HMAC hex digest as shown below:
HMAC Hex Digest
- If the signature you generate on your server matches the
razorpay_signaturereturned to you by the Checkout form, the payment received is from an authentic source.
Non-Transactional Flow
Razorpay provides a single exposed function that allows you to manage linked UPI accounts and access all non-transactional flows seamlessly.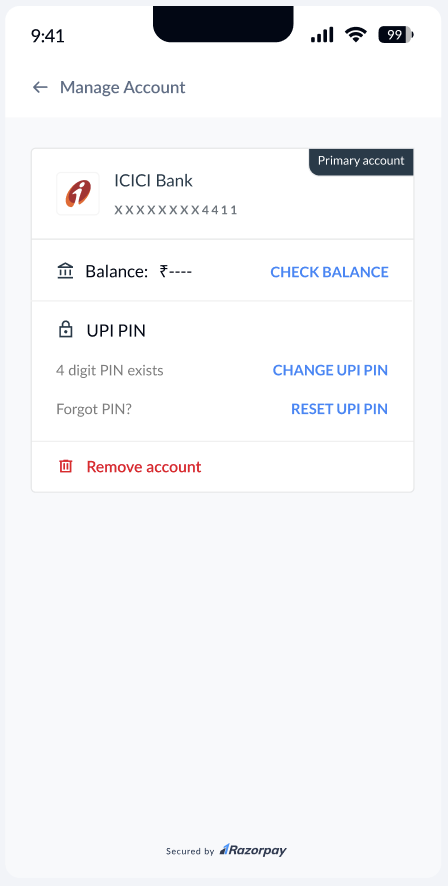
Manage UPI Accounts
Manage UPI Accounts
The SDK manages the linked
UpiAccounts on the application by triggering manageUpiAccounts(). The sequence of steps is as given below:- Fetch balance: Check the customer’s account balance.
- Change UPI PIN: Provide the customer the ability to change their UPI PIN.
- Reset UPI PIN: Let your customers reset the PIN for their account.
- Delete the account from the application: Let your customers delink, that is, remove a selected UPI account from your application.
Java
Request Parameters
Request Parameters
customerMobile mandatory
: string Mobile number of the customer.color optional
: string Colour in hex format.Response Parameter
Response Parameter
Models Exposed from the SDKs
The SDKs given below provide access to exposed models for seamless integration.UpiAccount
UpiAccount
2. Test Integration
We recommend the following:- Complete the integration on UAT before using the prod builds.
- Perform the UAT using the Razorpay-provided API keys.
3. Go-live Checklist
Complete these steps to take your integration live:- You should get your app id whitelisted by Razorpay to test on prod.
Handy TipsContact our integrations team to get your mobile number and app whitelisted.
-
Import the prod library from the GitHub repository →
https://github.com/upi-turbo/android-turbo-sample-app/tree/prod/app/libsprod branch. -
Add Proguard rules:
keepclassmembers,allowobfuscation class * { @com.google.gson.annotations.SerializedName <fields>; }keepclassmembers enum * { *; }keepclassmembers class * { @android.webkit.JavascriptInterface <methods>; }dontwarn com.razorpay.**keep class com.razorpay.** {*;}keep class com.olivelib.** {*;}keep class com.olive.** {*;}keep class org.apache.xml.security.** {*;}keep interface org.apache.xml.security.** {*;}keep class org.npci.** {*;}keep interface org.npci.** {*;}keep class retrofit2.** { *; }keep class okhttp3.** { *; }
- Replace the UAT credential with the Razorpay live keys for prod testing.